Sunday 19 June 2016

Nexus Modules/LineCards Naming Conventions

Hi Guys, Finally I am back!! I have been into Cisco Data Center Technologies from a long time. The first and most important thing  one should know is to get an understanding of how to take a brief specification information of the Nexus Switches Chassis and I/O Modules from the names/Model numbers. As I am more into the 7k series switches so I shall be taking examples of 7k switches

Chassis Identification:

Exact Model number tells two things:
1. Series of Nexus Switch/Chassis
2. Number of Slots in the chassis

For Example the 7k series has following models.

7004- 7000 Series and 4 Slots
7009- 7000 Series and 9 Slots
7010- 7000 Series and 10 Slots
7018- 7000 Series and 18 Slots
7702- 7700 Series and 2 Slots
7706- 7700 Series and 6 Slots
7710- 7700 Series and 10 Slots
7718 - 7700 Series and 18 Slots


Modules Identification:

Line Card Name will give you a bunch of information about its specifications. Below is one of the Line Card name taken as an example:

N77-M348XP-23L
N77   M3  48  X  P  23L 

N77 / N7K
Its indicates the type of chassis. N77 is 7700 chassis and N7K is 7000 chassis
M3 / M2 / M1 / F2 / F3
Indicates the series of Linecard. Detailed comparison chart can be seen on below link:
48
Indicates the number of ports on the linecard.
X / F / C / G
Indicates the speed of ports:
G is 1 Gig 
X is  10 Gig
F is 40 Gig
C  is 100 Gig
T / P / S / 2 / Q / K
This will tell you the type of interface. 
T is RJ45
S is SFP
P is SFP+
Q is QSFP+
K is Cisco CPAK
2 is X2
23L
The first digit (2) is the minimum number of fabric modules required for the card to operate, while the last digit (3) is the number of fabric modules required for the card to operate at maximum capacity.

Additionally, if the module has an additional "L" at the end, it designates that the module is a XL module. Primarily found on M1/M2 cards, and specifies that the card has extended hardware ressources (more routes, more MAC addresses etc.).


Monday 15 June 2015

Lab Setup on GNS3

 I will be doing all my labs on IOU that is "IOS on UNIX" integrated with GNS3 .
Follow the below steps and you will be done with the setup.

Step 1: 
First of all download the latest version of GNS3 from the below link and install it :
Note: Just make a community account to download the software
GNS3 Latest Version Download Here

Step 2: 
Just start the installation process like you do for other software.
Note: Check all the packages in the below windows during the installation process.


Step 3:
Now the next step in the process will be installation of Oracle Virtual Box. The latest verssion of the software can be downloaded by following the below link and download the Windows Version as this process is for Windows only. Install the software as you normally install some other software.

Oracle VirtualBox Download Here

Step 4:
Now download GNS3 IOU VM that will be then imported into the VirtualBox in the coming up steps. GNS3 IOU VM can be downloaded by following below link:

GNS3 IOU VM Download Here

Step 5:
Next download the iou images. Those images will be uploaded into the GNS3 IOU VM later on.
I am using below 2 images:
For L2->>> i86bi-linux-l2-adventerprise-15.1b.bin
For L3->>> i86bi-linux-l3-adventerprisek9-15.4.1T.bin

Note: IOU Images are for CISCO internal use only. Find a way to obtain it from Cisco

Step 6:
A license file will be required later in the process so you need to obtain your license from cisco.

 Step 7:
All prerequisites have been completed as per my knowledge :P.
In this step we will be importing the VM into VirtualBox and necessary settings will be done.

          7a. Open VirtualBox Manager and Go to File > Import Appliance.
          
          7b. Give path to the IOU-VM you have downloaded in the below Window:
            

             7c. Click Next and then an appliance Settings window will appear. Just do nothing and     proceed with the Import button. Import process will start.

             7d. Right click on the GNS3 IOU VM from the Virtual Box Manager and then click on Settings. Below window will appear. Select Network from the left side Menu and Please make sure that Network Adapter is set to "Host-Only Adapter" and the selected Name of the Adapter is of VirtualBox Adapter "VirtualBox Host-Only Adapter":


 Step 8:
 Switch ON the IOU VM from Virtualbox and note down the IP address shown on login screen to upload the IOU L2/L3 images that you have downloaded in Step 5. Please note that IP is not always same. It can be different in your case.


Open it into the browser and click on Upload Images from the below screen and upload the images into the vm to use them in GNS3.


Copy the complete path of you image as shown in the browser screen, later it will be used for configuring the GNS3. I have highlighted my image in the below image.


 Step 9:
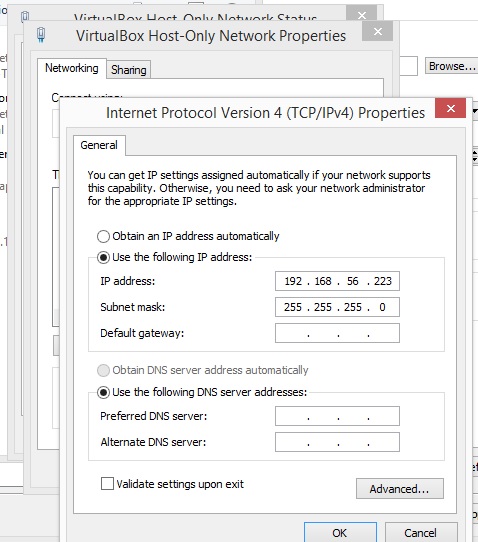
 From your network connections configure your Virtualbox Adapter with the IP with the same network, the IOU VM is of. e.g in my case 192.168.56.101 was the vm IP so i assigned 192.168.56.223 as shown below.


 Step 10:
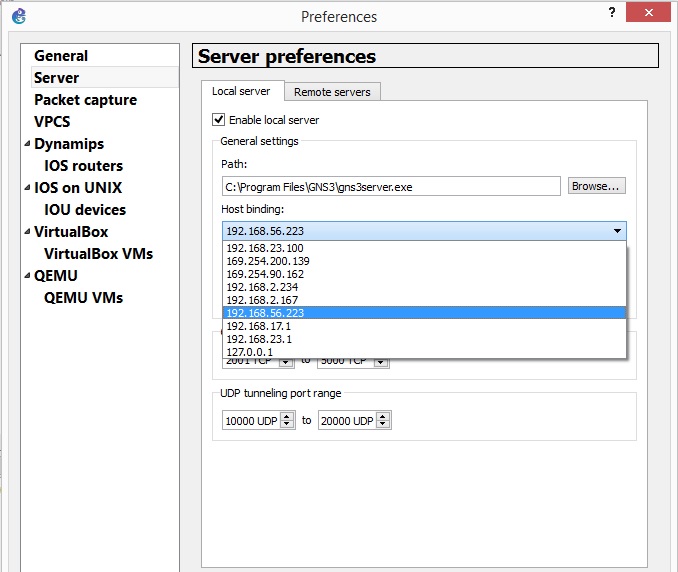
Open GNS3 for the configuration of L2 and L3 images and go to Edit > Preferences, preferences window will open now. Click on the 2nd option in the left navigation pane i-e server. In this screen select the IP of the Virtualbox adapter in the "Host Bindings field" as in my case I have selected the adapter as configured above.


In this same section select "Remote Servers" Tab and then configure the IP of the IOU VM in it and add it as shown in below image.


 Step 11:
In this step we will be creating Switch and Router devices but before that we will be importing the license file that we have downloaded earlier.For this just click on "IOS on UNIX" and give path to the license file as shown in below image.


Navigate to the "IOS on UNIX" >  "IOU devices" and click on "New" then follow the below images.


In the below screen you will do the following settings for Router and Switch and then Finish it each time:
 ROUTER:
Name: R
IOU image: The l3 image link you copied from browser earlier
Type: L3 image

SWITCH:
Name:SW
IOU image: The l2 image link you copied from browser earlier
Type: L2 image

 Step 12:

Your devices are now ready to use just add them to make your custom topology. Shown below are the added devices.


IOS Images can also be added from Dynamips > IOS Routers section and can be used with the IOU Switches.  Please let me know via comment if you have any problem while setting up the Lab.

Tuesday 26 May 2015

GLBP Basic

Topology Makeup:

All the spokes (IOU2 - IOU5) will be part of GLBP group. IOU2 priority will be set as 200 so will be selected as Active Virtual Gateway(AVG) and IOU3 would be the standby AVG as its priority is 150, the second highest priority among IOU3-IOU5. At start of topology IOU3-IOU5 will be acting as Actve virtual Forwarders(AVF). AVG(IOU2) would be responsible for assigning vMAC and AVF numbers to the other members of GLBP group.

Topology:


GLBP Group Members: IOU2 - IOU5

Below are the configurations for each of the switches:

IOU1:

IOU1#conf t
IOU1(config)#no ip igmp snooping
IOU1(config)#int range eth 0/0 - 3
IOU1(config-if-range)#no shut
IOU1(config-if-range)#switchport trunk encapsulation dot1q
IOU1(config-if-range)#switchport mode trunk
IOU1(config-if-range)#exit
IOU1(config)#vlan 50
IOU1(config-vlan)#exit
IOU1(config)#int vlan 50
IOU1(config-if)#no shut
IOU1(config-if)#end
IOU1#wr

IOU2: 


IOU2#conf t
IOU2(config)#no ip igmp snooping
IOU2(config)#int eth 0/0
IOU2(config-if)#no shut
IOU2(config-if)#switchport trunk encapsulation dot1q
IOU2(config-if)#switchport mode trunk
IOU2(config-if)#exit
IOU2(config)#vlan 50
IOU2(config-vlan)#exit
IOU2(config)#int vlan 50
IOU2(config-if)#no shut
IOU2(config-if)#ip address 192.168.1.10 255.255.255.0
IOU2(config-if)#glbp 1 priority 200
IOU2(config-if)#glbp 1 preempt
IOU2(config-if)#glbp 1 ip 192.168.1.1
IOU2(config-if)#end
IOU2#wr


IOU3: 


IOU3#conf t
IOU3(config)#no ip igmp snooping
IOU3(config)#int eth 0/0
IOU3(config-if)#no shut
IOU3(config-if)#switchport trunk encapsulation dot1q
IOU3(config-if)#switchport mode trunk
IOU3(config-if)#exit
IOU3(config)#vlan 50
IOU3(config-vlan)#exit
IOU3(config)#int vlan 50
IOU3(config-if)#no shut
IOU3(config-if)#ip address 192.168.1.11 255.255.255.0
IOU3(config-if)#glbp 1 priority 150
IOU3(config-if)#glbp 1 preempt
IOU3(config-if)#glbp 1 ip 192.168.1.1
IOU3(config-if)#end
IOU3#wr

IOU4: 


IOU4#conf t
IOU4(config)#no ip igmp snooping
IOU4(config)#int eth 0/0
IOU4(config-if)#no shut
IOU4(config-if)#switchport trunk encapsulation dot1q
IOU4(config-if)#switchport mode trunk
IOU4(config-if)#exit
IOU4(config)#vlan 50
IOU4(config-vlan)#exit
IOU4(config)#int vlan 50
IOU4(config-if)#no shut
IOU4(config-if)#ip address 192.168.1.12 255.255.255.0
IOU4(config-if)#glbp 1 priority 100
IOU4(config-if)#glbp 1 ip 192.168.1.1
IOU4(config-if)#end
IOU4#wr
IOU5: 


IOU5#conf t
IOU5(config)#no ip igmp snooping
IOU5(config)#int eth 0/0
IOU5(config-if)#no shut
IOU5(config-if)#switchport trunk encapsulation dot1q
IOU5(config-if)#switchport mode trunk
IOU5(config-if)#exit
IOU5(config)#vlan 50
IOU5(config-vlan)#exit
IOU5(config)#int vlan 50
IOU5(config-if)#no shut
IOU5(config-if)#ip address 192.168.1.13 255.255.255.0
IOU5(config-if)#glbp 1 priority 100
IOU5(config-if)#glbp 1 ip 192.168.1.1
IOU5(config-if)#end
IOU5#wr

RESULTS: 
IOU2:
 IOU3: 
 IOU4:
 IOU5:


This configuration has been done without any Weighting, Tracking , authentication etc. 
Will add details later sometime as i am preparing for my CCNP- SW exam and this above basic lab is part of the High Availability Topic. Do let me know if i am wrong somewhere as i am also learning.