I will be doing all my labs on IOU that is "IOS on UNIX" integrated with GNS3 .
Follow the below steps and you will be done with the setup.
Step 1:
First of all download the latest version of GNS3 from the below link and install it :
Note: Just make a community account to download the software
GNS3 Latest Version Download Here
Step 2:
Just start the installation process like you do for other software.
Note: Check all the packages in the below windows during the installation process.

Step 3:
Now the next step in the process will be installation of Oracle Virtual Box. The latest verssion of the software can be downloaded by following the below link and download the Windows Version as this process is for Windows only. Install the software as you normally install some other software.
Oracle VirtualBox Download Here
Step 4:
Now download GNS3 IOU VM that will be then imported into the VirtualBox in the coming up steps. GNS3 IOU VM can be downloaded by following below link:
GNS3 IOU VM Download Here
Step 5:
Next download the iou images. Those images will be uploaded into the GNS3 IOU VM later on.
I am using below 2 images:
For L2->>> i86bi-linux-l2-adventerprise-15.1b.bin
For L3->>> i86bi-linux-l3-adventerprisek9-15.4.1T.bin
Note: IOU Images are for CISCO internal use only. Find a way to obtain it from Cisco
Step 6:
A license file will be required later in the process so you need to obtain your license from cisco.
Step 7:
All prerequisites have been completed as per my knowledge :P.
In this step we will be importing the VM into VirtualBox and necessary settings will be done.
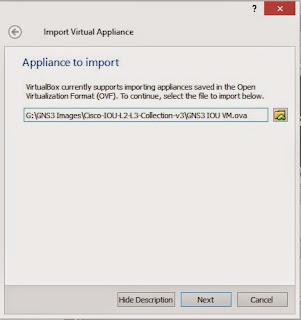
7a. Open VirtualBox Manager and Go to File > Import Appliance.
 7b. Give path to the IOU-VM you have downloaded in the below Window:
7c. Click Next and then an appliance Settings window will appear. Just do nothing and proceed with the Import button. Import process will start.
7d. Right click on the GNS3 IOU VM from the Virtual Box Manager and then click on Settings. Below window will appear. Select Network from the left side Menu and Please make sure that Network Adapter is set to "Host-Only Adapter" and the selected Name of the Adapter is of VirtualBox Adapter "VirtualBox Host-Only Adapter":

Step 8:
Switch ON the IOU VM from Virtualbox and note down the IP address shown on login screen to upload the IOU L2/L3 images that you have downloaded in Step 5. Please note that IP is not always same. It can be different in your case.

Open it into the browser and click on Upload Images from the below screen and upload the images into the vm to use them in GNS3.
 Copy the complete path of you image as shown in the browser screen, later it will be used for configuring the GNS3. I have highlighted my image in the below image.

Step 9:
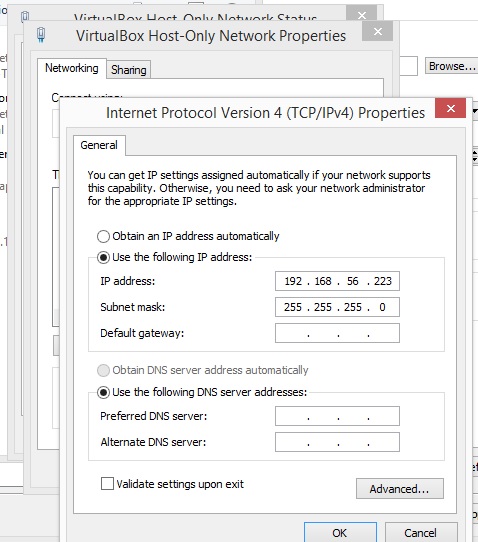
From your network connections configure your Virtualbox Adapter with the IP with the same network, the IOU VM is of. e.g in my case 192.168.56.101 was the vm IP so i assigned 192.168.56.223 as shown below.

Step 10:
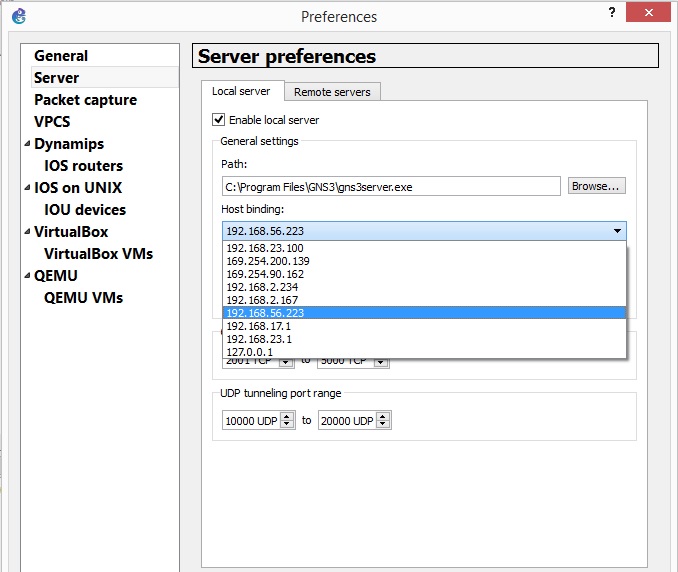
Open GNS3 for the configuration of L2 and L3 images and go to Edit > Preferences, preferences window will open now. Click on the 2nd option in the left navigation pane i-e server. In this screen select the IP of the Virtualbox adapter in the "Host Bindings field" as in my case I have selected the adapter as configured above.

In this same section select "Remote Servers" Tab and then configure the IP of the IOU VM in it and add it as shown in below image.

Step 11:
In this step we will be creating Switch and Router devices but before that we will be importing the license file that we have downloaded earlier.For this just click on "IOS on UNIX" and give path to the license file as shown in below image.

Navigate to the "IOS on UNIX" > "IOU devices" and click on "New" then follow the below images.

In the below screen you will do the following settings for Router and Switch and then Finish it each time:
ROUTER:
Name: R
IOU image: The l3 image link you copied from browser earlier
Type: L3 image
SWITCH:
Name:SW
IOU image: The l2 image link you copied from browser earlier
Type: L2 image

Step 12:
Your devices are now ready to use just add them to make your custom topology. Shown below are the added devices.

IOS Images can also be added from Dynamips > IOS Routers section and can be used with the IOU Switches. Please let me know via comment if you have any problem while setting up the Lab.
Follow the below steps and you will be done with the setup.
Step 1:
First of all download the latest version of GNS3 from the below link and install it :
Note: Just make a community account to download the software
GNS3 Latest Version Download Here
Step 2:
Just start the installation process like you do for other software.
Note: Check all the packages in the below windows during the installation process.
Step 3:
Now the next step in the process will be installation of Oracle Virtual Box. The latest verssion of the software can be downloaded by following the below link and download the Windows Version as this process is for Windows only. Install the software as you normally install some other software.
Oracle VirtualBox Download Here
Step 4:
Now download GNS3 IOU VM that will be then imported into the VirtualBox in the coming up steps. GNS3 IOU VM can be downloaded by following below link:
GNS3 IOU VM Download Here
Step 5:
Next download the iou images. Those images will be uploaded into the GNS3 IOU VM later on.
I am using below 2 images:
For L2->>> i86bi-linux-l2-adventerprise-15.1b.bin
For L3->>> i86bi-linux-l3-adventerprisek9-15.4.1T.bin
Note: IOU Images are for CISCO internal use only. Find a way to obtain it from Cisco
Step 6:
A license file will be required later in the process so you need to obtain your license from cisco.
Step 7:
All prerequisites have been completed as per my knowledge :P.
In this step we will be importing the VM into VirtualBox and necessary settings will be done.
7a. Open VirtualBox Manager and Go to File > Import Appliance.


7c. Click Next and then an appliance Settings window will appear. Just do nothing and proceed with the Import button. Import process will start.
7d. Right click on the GNS3 IOU VM from the Virtual Box Manager and then click on Settings. Below window will appear. Select Network from the left side Menu and Please make sure that Network Adapter is set to "Host-Only Adapter" and the selected Name of the Adapter is of VirtualBox Adapter "VirtualBox Host-Only Adapter":

Step 8:
Switch ON the IOU VM from Virtualbox and note down the IP address shown on login screen to upload the IOU L2/L3 images that you have downloaded in Step 5. Please note that IP is not always same. It can be different in your case.

Open it into the browser and click on Upload Images from the below screen and upload the images into the vm to use them in GNS3.

Step 9:
From your network connections configure your Virtualbox Adapter with the IP with the same network, the IOU VM is of. e.g in my case 192.168.56.101 was the vm IP so i assigned 192.168.56.223 as shown below.
Step 10:
Open GNS3 for the configuration of L2 and L3 images and go to Edit > Preferences, preferences window will open now. Click on the 2nd option in the left navigation pane i-e server. In this screen select the IP of the Virtualbox adapter in the "Host Bindings field" as in my case I have selected the adapter as configured above.
In this same section select "Remote Servers" Tab and then configure the IP of the IOU VM in it and add it as shown in below image.

Step 11:
In this step we will be creating Switch and Router devices but before that we will be importing the license file that we have downloaded earlier.For this just click on "IOS on UNIX" and give path to the license file as shown in below image.

Navigate to the "IOS on UNIX" > "IOU devices" and click on "New" then follow the below images.

In the below screen you will do the following settings for Router and Switch and then Finish it each time:
ROUTER:
Name: R
IOU image: The l3 image link you copied from browser earlier
Type: L3 image
SWITCH:
Name:SW
IOU image: The l2 image link you copied from browser earlier
Type: L2 image

Step 12:
Your devices are now ready to use just add them to make your custom topology. Shown below are the added devices.

IOS Images can also be added from Dynamips > IOS Routers section and can be used with the IOU Switches. Please let me know via comment if you have any problem while setting up the Lab.
Great work Brother, Thank you so Much!
ReplyDeleteWelcome! I am glad it helped someone. Please stay tuned!!
ReplyDeleteThanks Bro...Realy Helpfull
ReplyDeleteHi,
ReplyDeleteI'm getting following Error while adding the Router and Switch and red 'S' shown on Router and Switch Pictures.....
Error while creating project: Client version 1.3.7 differs with server version 1.3.3
Hi Asim,
Delete1. Go to your IOU-VM Network Settings and change the network adapter to NAT so that you could connect to the internet
2. Login to your IOU-VM and run the below command without quotes. Make sure you are connected to internet.
"pip3 install gns3-server==1.3.7"
I am still working on 1.3.3 so don't know about the update 1.3.7.
If update is available it would work fine otherwise you need to install the 1.3.3 version of GNS3
Hi Muhammad,
ReplyDeleteYou are the best....
Worked perfectly
Thanks
My IOU are not loadingplz help
ReplyDeleteMay I know the error please?
DeleteI donot get any error Hamid, whenver i place the IOU only stop symbol is displayed and i cannot start the IOU
DeletePlease help desperately need this to work ...
DeleteThere must be something missing bro. Can you please review the steps?
DeleteI have changed the OVA version now i have followed all the steps but now the error is OUI's are not connecting with the server at port 8000 timeout
Deletewebsocket handshake error
DeleteSeems to be a connectivity issue. Adapters Settings of VM could be the problem. Just check a ping from your system to vm.
DeleteThis comment has been removed by the author.
ReplyDeleteBrilliant work by Muhammad Hamid Ashraf, Really helpful
ReplyDeletewhere can I get the i86bi image from
ReplyDeleteYou can find it on torrent..search for "cisco iou l2 l3 collection" on google
Deleteneed some help regarding remote access vpn on asa 5520
ReplyDeleteHello bro.
ReplyDeleteEverything went right except i can't see ip address on VM which is to be used to upload IOUs
it is like "http://8000/upload"
Any clue regarding this issue please
Thanks
Farhad jamali
Hi Farhad,
DeleteHave you changed the network adapter type of Virtual Machine to Host only adapter? If yes then power off it and start again. Hopefully will get the ip address. If not, please let me know. Thanks
Regards,
Muhammad Hamid
Hi,
ReplyDeleteMy browser is not opening the link. Everything seems to work OK. Please any help?
kessy
Hey Kessy,
DeletePlease check your network adapter settings in VM ware workstation..It must be set to "Host only Adapter"..Kindly review all the steps, you must have missed something. If still not resolved let me know.
I am unable to download the L3 file i86bi-linux-l3-adventerprisek9-15.4.1T.bin. Any suggestions?
ReplyDelete